
Walkthrough - Financial Services Engine
- Creating an Entity Structure
- A Company Organization
- Subsidiary entities within the company structure
- Creating Allocation Rules, and Paths for the structure
- Creating Instruments with dynamic Allocation Mappings
- Setting up the Transaction Engine
- Creating Transaction Types
- Creating GL Classifications
- Creating GL Accounts
- Creating Transaction Codes
- Booking new transaction (with our new transaction codes) against instruments
- Setting up a GL Rollup report to automatically consolidate and report across our GL
You can follow along to this walkthrough with the following video:
All of this can be configured from a completely blank system with new product/add-ins. Just the basic platform itself can be configured from scratch in minutes to setup all of the above.
Creating An Entity Structure
We're going to create the following structure for our overall organization:
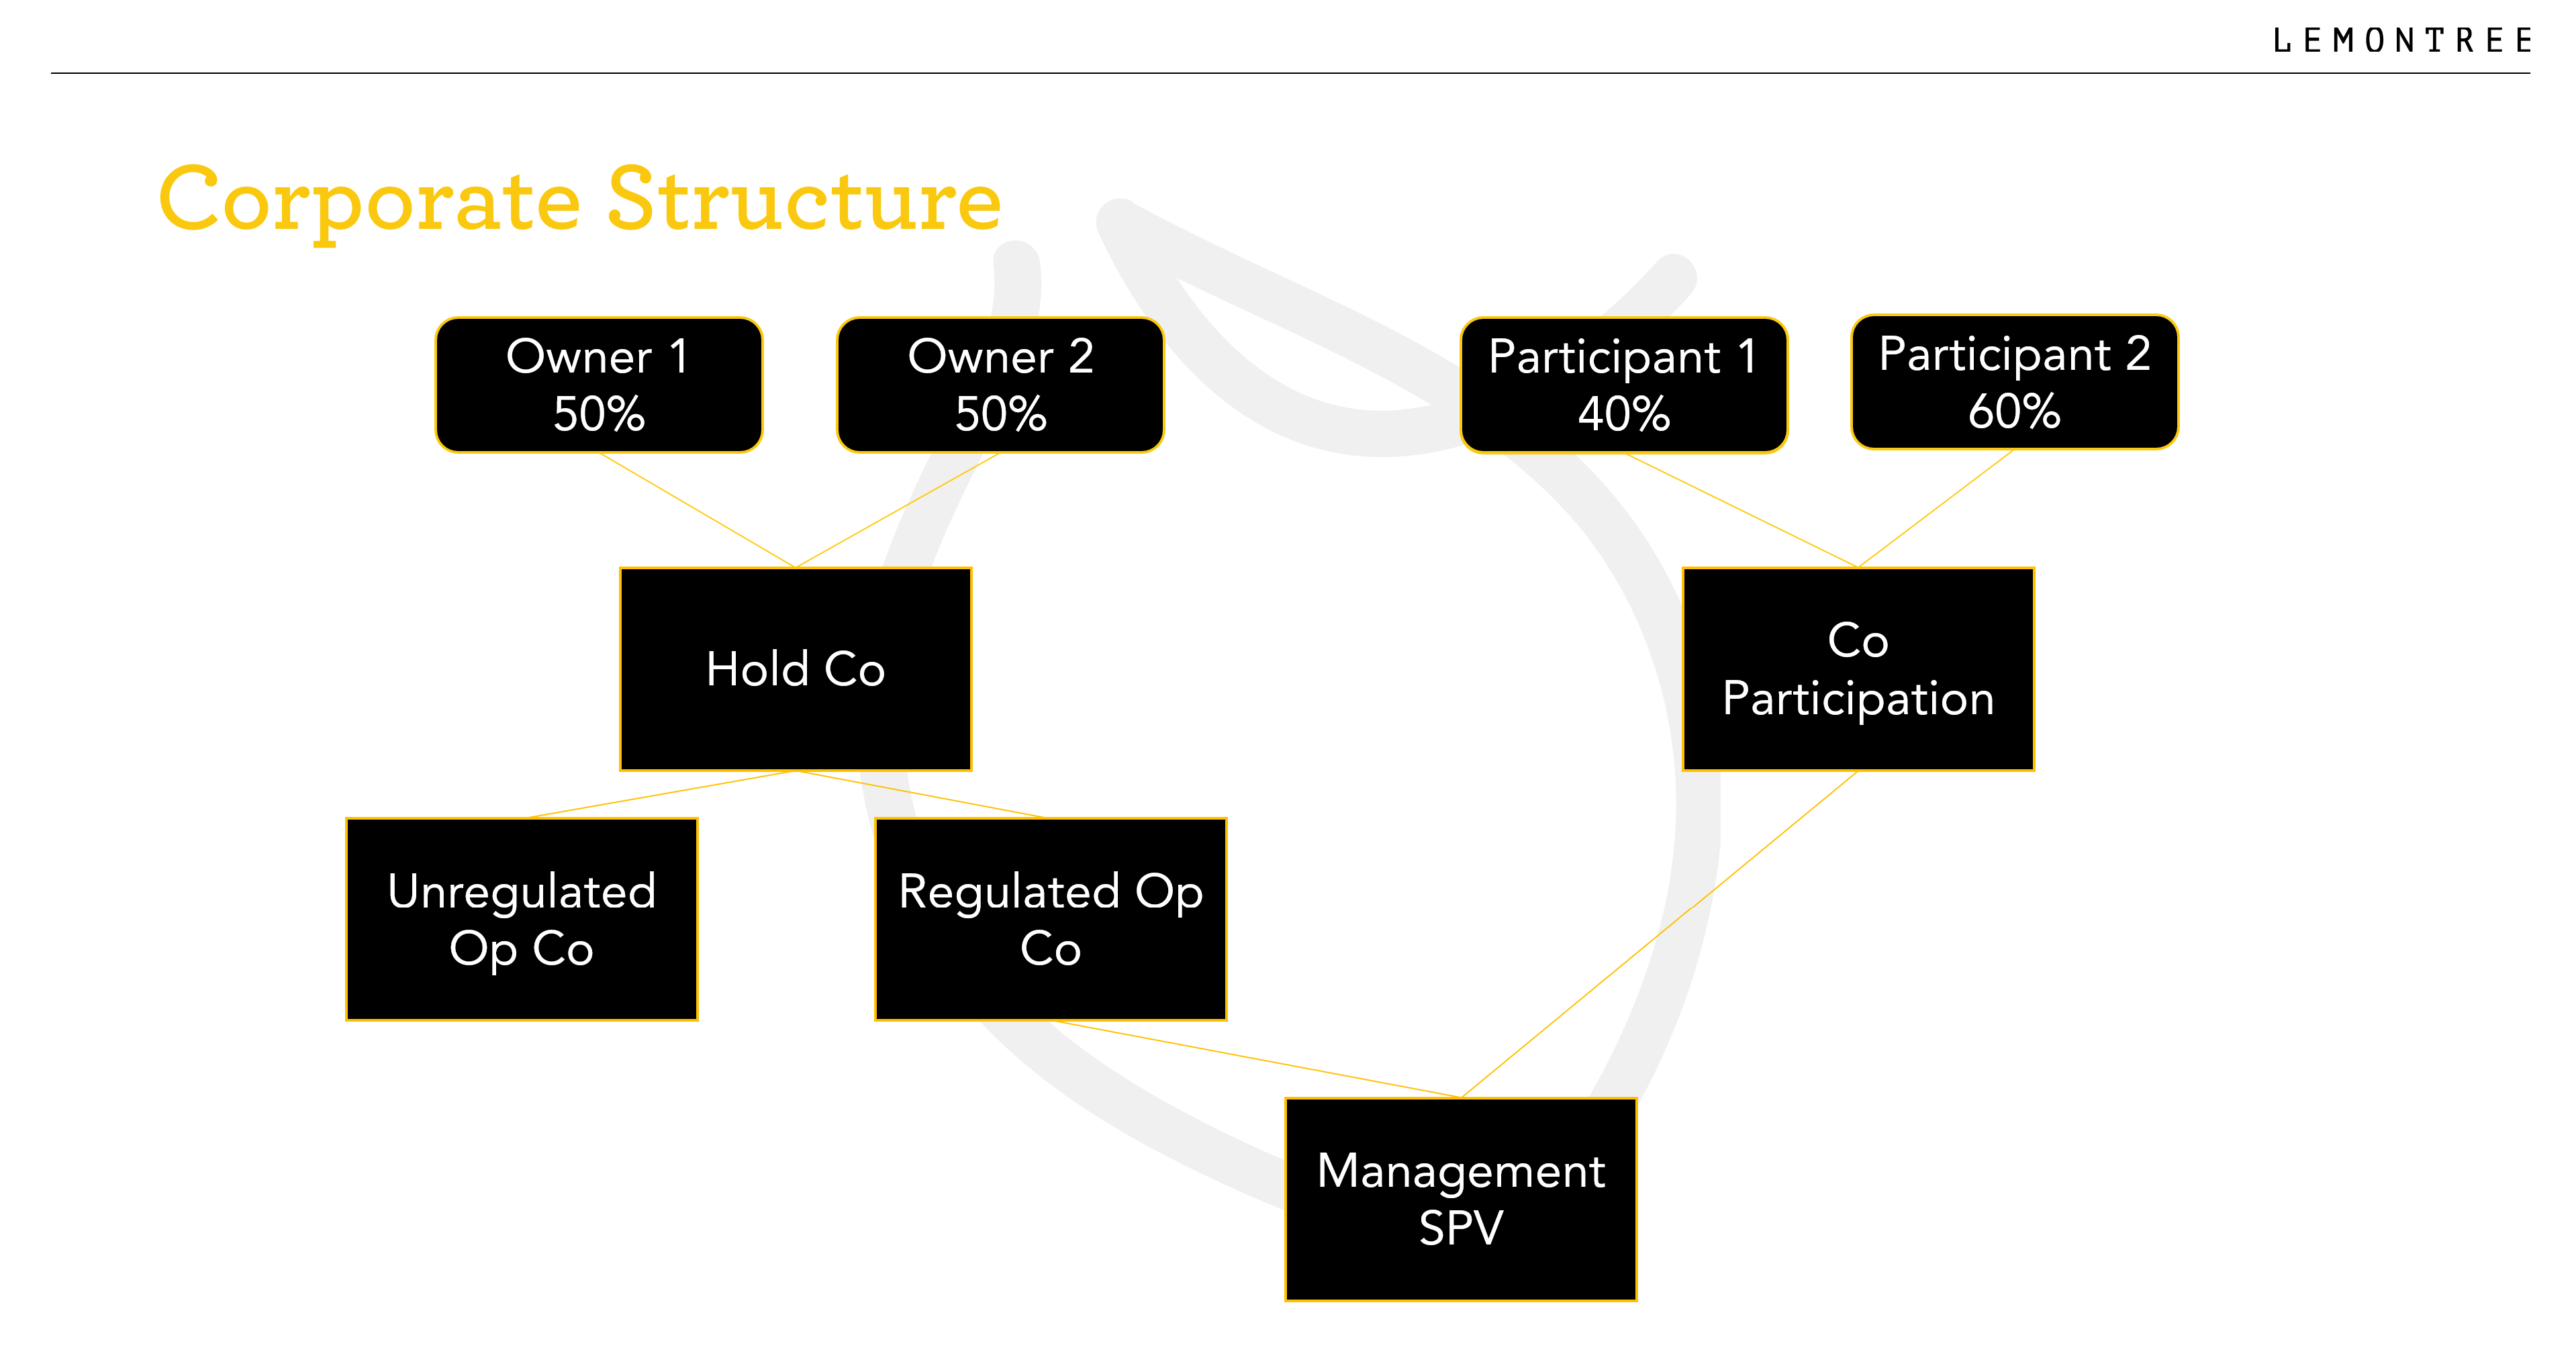
In the base LemonEdge platform we have the following entities; Company Structures, Companies, and People. We'll be using the Company Structure for the overall organization, Companies for Hold Co, Co Participation and all entities below, and People for Owners and Participants.
These are the base entities in the platform, but if you are using a supplied product, or your own custom AddIns, then you can have many more entity types specific to your needs that can all appear differently in the structure.
For instance the Alternative Asset solution has AIV's, SPV's, Blockers, Partners and more.
To create our Umbrella Corporation we simply create a new Company Structure, with the following properties:
| Name | Value |
| Code | UMCO |
| Name | Umbrella Co |
| Currency | USD |
| Rounding Level | Currency |
| Year End | 31/12/2021 |
If you are running this on a blank system you may not have a currency of USD setup. In which case create a new Currency with a Name of United States Dollar, Three Letter Code of USD, Symbol of $, and Decimal Places of 2. Once you've saved that you'll be able to select it in the Company Structure above, you can do both at the same time.
That's it.
Now we need to create all the entities that will make up this company structure.
Creating Entities Within Structure
The entities, apart from the Owners, and Participants, are all Companies within our structure. Companies and People are entities in their own right, and do not necessarily exist within a structure unless they are added to it, and included in Allocation Paths.
For just now these will just be companies in the system, but later we will add them to the structure itself and relevant paths.
We can create the following Companies:
| Entity | Properties |
| Hold Co | Name: Hold Co Code: HC Legal Name: Hold Co Currency: USD Has GL: True Allow Rule Allocations: True |
| Regulated Op Co | Name: Regulated Op Co Code: ROC Legal Name: Regulated Op Co Currency: USD Has GL: True Allow Rule Allocations: True |
| Unregulated Op Co | Name: Unregulated Op Co Code: UROC Legal Name: Unregulated Op Co Currency: USD Has GL: True Allow Rule Allocations: True |
| Co Participation | Name: Co Participation Code: CP Legal Name: Co Participation Currency: USD Has GL: True Allow Rule Allocations: True |
| Management SPV | Name: Management SPV Code: MSP Legal Name: Management SPV Currency: USD Has GL: True Allow Rule Allocations: True |
Marking the entities as Has GL ensures we can create transactions against them and include them as entities in the Umbrella Co Company Structure we created above.
Marking the entities as Allow Rule Allocation indicates we can include them in Allocation Rules and Paths which we also need to be able to do to include them as entities in the Umbrella Co Company Structure.
To create the Owners and Participants we need to create the following People:
| Entity | Properties |
| Owner 1 | Name: Owner 1 Code: O1 Legal Name: Owner 1 Currency: USD Allow Rule Allocations: True |
| Owner 2 | Name: Owner 2 Code: O2 Legal Name: Owner 2 Currency: USD Allow Rule Allocations: True |
| Participant 1 | Name: Participant 1 Code: O1 Legal Name: Participant 1 Currency: USD Allow Rule Allocations: True |
| Participant 2 | Name: Participant 2 Code: O2 Legal Name: Participant 2 Currency: USD Allow Rule Allocations: True |
Now that we have all our entities we'll be able to add them to the Umbrella Co Structure and associated Allocation Rules/Paths.
Adding Entities To A Structure
To add the companies (only) to the Umbrella Co Company Structure, you first need to open the Umbrella Co.
Once you've opened it you can use the Set Entities view to insert existing entities into being part of this structure. For this structure we will want to add all of the companies we created; Hold Co, Regulated Op Co, Unregulated Op Co, Co Participation, and Management SPV.
You can then save those changes and those companies will now be part of the Umbrella Co company structure. The system will not diagram anything yet, as it does not understand the actual relationship between those entities. We do that with Allocation Rules and Paths.
Adding Allocation Rules
In order for the system to actually understand the hierarchical relationship for those entities, and to be able to allocate among the, we need to add Allocation Rules indicating which entity can allocate to any others.
To do that we create the following Allocation Rules:
| Rule | Amounts |
| Entity: Management SPV Name: Original | Co Participation: 20 Regulated Op Co: 80 |
| Entity: Regulated Op Co Name: Original | Hold Co: 100 |
| Entity: Unregulated Op Co Name: Original | Hold Co: 100 |
| Entity: Hold Co Name: Original | Owner 1: 50 Owner 2: 50 |
| Entity: Co Participation Name: Original | Participant 1: 40 Paticipant 2: 60 |
You can create as many different allocation rules against an entity as you like, to represent all the ways in which amounts can be directly allocated to entities above them.
All of these rules are against entities in the Umbrella Co entity set that we created earlier. Rules belong to an Entity Set (Company Structure in this case) and an Entity (Company in this case) within it.
In this example we're just allocating the same amount for Amount and Amount B for the above Allocation Amounts. They can have different values depending how you want to use them in the system. The values can be a percentage or any actual amount, the system will calculate percentages from the total values in the rule regardless. There are other options, such as Effective Date and Timing. that you can find more information about from Allocation Amounts. For this example they are fine with the defaults.
Now we have Rules, these can then be used in Allocation Paths to indicate a unique route through the structure for allocation.
Adding Allocation Paths
It's important to note the system doesn't use a "flat" allocation rule for transactions. Rather the system uses Allocation Paths which describe how to allocate underlying transactions through a structure providing far greater flexibility and capability.
Because the system understands the structure it can facilitate far more functionality in the transaction engine then legacy systems with their "flat" allocation approach can provide.
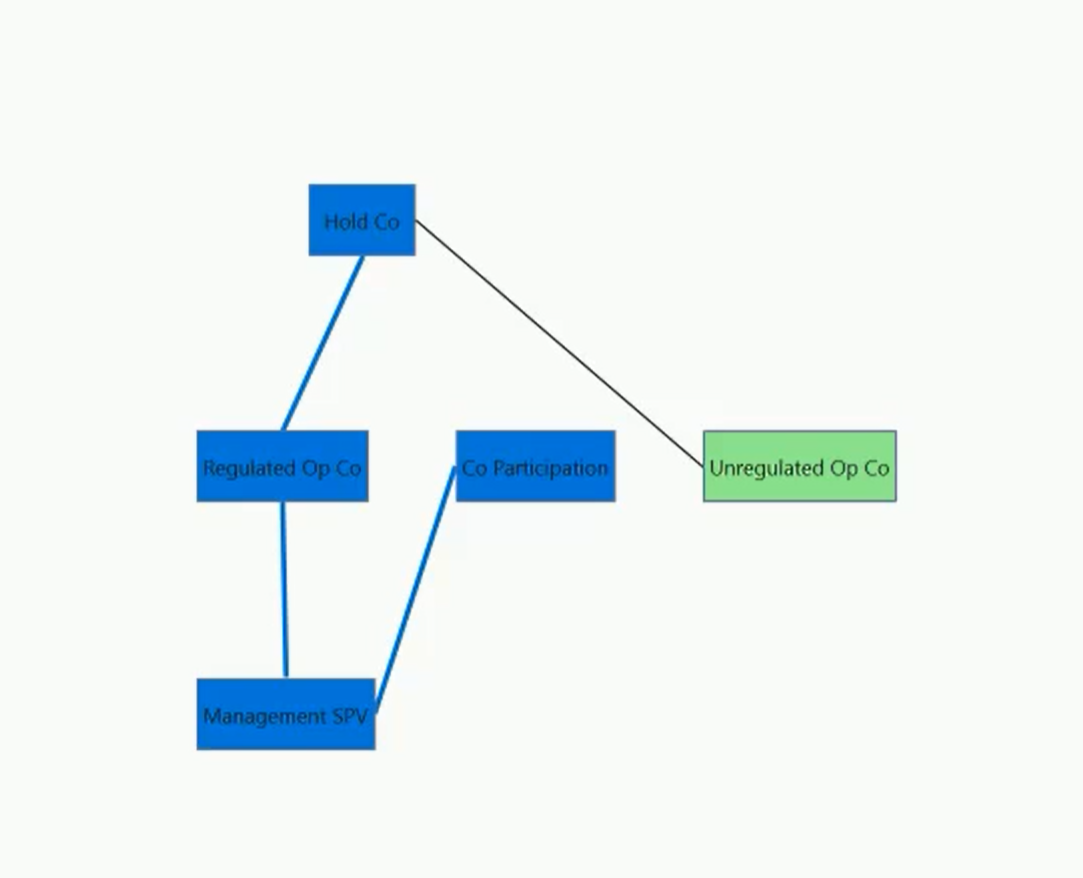
We're going to create the following Allocation Path:
| Path | Route |
| Name: Main SPV -> HoldCo/Part Set: Umbrella Co | Entity: Management SPV, Rule: Original Entity: Regulated Op Co, Rule: Original Entity: Hold Co, Rule: Original Entity: Co Participation, Rule: Original |
| Name: Unregulated Set: Umbrella Co | Entity: Unregulated Op Co, Rule: Original Entity: Hold Co, Rule: Original |
Once we've created our allocation path, the system will be aware of the hierarchical structure of Umbrella Co from all the various different paths. If you open Umbrella Co it can now diagram the structure, like so:
Adding An Instrument
Instruments are a core object in the platform, that all Transactions can be entered against. Transactions against an Instrument can then be allocated according to Paths either dynamically or manually.
In most systems Instruments are a base object that other custom objects inherits from to acquire all their functionality and expand the attributes of an Instrument. For instance in our Alternative Asset system Lots inherit Instruments, and are used in place of them, whilst also belonging to Securities and then Issuers.
For the purpose of this example on a blank system we're going to create a simple Instrument that we will post transactions against later. We're going to create a new Instrument with the following properties:
| Name | Value |
| Name | Asset A |
| Currency | USD |
| Owning Entity | Management SPV |
We're saying this Instrument is owned by Management SPV so we can see the transactions against it be allocated along our path.
In order for the transactions to be automatically allocated by the system, we need Instrument Sets to dynamically hold Allocation Mappings for the transactions to use.
Adding An Instrument Set
Instrument Sets are an extremely powerful dynamic collection of Instruments within the platform. Like Instruments they can be extended by any custom system to hold more attributes and configurability. For instance in the Asset Management system Instrument Sets are expanded to include Original Lot Dates, Brokers and Strategies.
Instrument Sets can be used throughout the system as they are basically a useful collection of instruments that are dynamically identified every time they are used. We're going to use them for Allocation Mappings, but they can be used for reporting, and other uses too.
In this example we're creating a simple Instrument Set that will dynamically always include our above created instrument: Asset A.
To create an Instrument Set we first need an Instrument Set Type, if you are running this on a blank system you'll need to create an Instrument Set Type first with a Name of Allocations.
We're going to create a new Instrument Set with a Name of Management SPV, Instrument Set Type of Allocations (that we may have just created prior), and the following Instrument Set Items:
| Exclude | Instrument | Currency | Owning Entity |
| False | Management SPV |
When you save that you'll see the Matching Instruments view will immediately dynamically analyze the set and display all the matching Instruments. In this case it's just the one Instrument we created above; the Asset A.
As you can see we could have added the Instrument explicitly, or by other attributes too.
The great thing about this Instrument Set is that it is dynamic. As we add Instruments to Management SPV they are automatically included in this set without us having to do anything else.
Now we have an Instrument Set we can use that in Allocation Mappings.
Creating An Allocation Mapping
Allocation Mappings allow us to associate a dynamic set of Instruments with an Allocation Path that should automatically be used to allocate their Transactions. We're going to use that to make sure Transactions we create against Asset A are automatically allocated via our Man SPV -> Holdco/Part Allocation Path.
To create a new Allocation Mapping we are simply setting it up with the following properties:
| Property | Value |
| Allocation Path | Man SPV -> Holdco/Part |
| Instrument Set | Management SPV |
| Instrument |
Now the system understands how to automatically map all Instruments in the Management SPV Instrument Set (Just Asset A for now).
You can see this in the Actions tab against Umbrella Co, as the Unmapped Instruments view shows that all our Instruments for this Company Structure belong to mappings, and the system understands how to allocate them.
We can also see that by opening the Asset A itself, and the Structure view will highlight the path that will automatically be used (Man SPV -> Holdco/Part) to allocate all the transactions against this Instrument.
Configuring Transactions
Now we have our Entities, Company Structure, Rules, Paths and Instruments all setup we need to be able to create transactions against the Instrument (Asset A) to see how they are automatically allocated through the Allocation Path.
If we are using a blank system we will need to configure our transactions from scratch. First we need a Ledger.
Adding A Ledger
We just need one ledger to hold our transaction values just now, though we can obviously configure as many as we like. We'll create the following standard ledger:
| Property | Value |
| Name | Base |
| Description | |
| Is System | True |
We don't need to create one if we already have an existing ledger we can use.
Adding Transaction Types
Transaction Types are the core of the values recorded by the Transaction Engine. They allow you to define different values to be tracked by the engine for both Portfolio and Capital transactions. This provides the configuration required for a multi-currency, multi-ledger, hierarchical aware, transaction engine that can work across financial services.
Again if you are following this walkthrough with a blank system, we will need to add some Transaction Types so we can create transactions against our Asset A instrument. For now we are only going to create portfolio transaction values, so we will start by creating the following Transaction Type:
| Property | Value |
| Name | Portfolio |
| Type | Portfolio |
| Description |
For that Transaction Type, we want to create the following Transaction Type Values:
| Name | Values |
| Current Cost | Code: CUC Entry: Local |
| Cost Sold | Code: COS Entry: Local |
| Income Accrual | Code: INA Entry: Local |
| Income Payment | Code: INP Entry: Local |
These are the values that our transaction engine is now capable of tracking against any, and all, transactions that we configure within the system. Obviously we can create as many as we like, including Capital as well as Portfolio values.
Adding GL Classifications
We want to add GL Accounts to the system so we can use them in our transactions we're going to configure later. Before we create the GL Accounts we want to add a GL Classification which we can use for reporting across the GL Accounts. We can have as many GL Classifications as we require allowing us to categorize GL Accounts for US GAAP, IFRS, etc.
In this example we're going to create a new GL Classification with a Name of Simple and the following Names:
| Name |
| Income |
| Purchase |
We're going to use this for classifying our GL Accounts and for reporting.
Adding GL Accounts
We can create GL Accounts to represent the full chart of accounts that we want to record everything in within our system. All GL Postings are marked against a GL Account, Ledger and Entity, along with dates, amounts and other attributes. The multi-currency, multi-ledger GL is incredibly powerful, fast, and easy to report against.
We don't pollute the GL with unnecessary information, all contextual data can be found against the Transactions associated with GL entries. The GL is pure and highly efficient for reporting across.
We're going to create a few simple GL Accounts that we can automatically get the system to post to when we configure our Transaction Codes. We need to create the following GL Accounts:
| Name | Values |
| Dividend Receivable | Code: 12000 - Dividend Receivable *Simple: Income |
| Investment Cost | Code: 11000 - Investment Cost *Simple: Purchase |
| Cash | Code: 10000 - Cash *Simple: |
*Simple: This allows you to select a GL Classification Name for each of the GL Accounts for "Simple" GL CLassification we created above.
They can all have the default values of Type=BalanceSheet and NaturalBalance=Credit for now, as they are only for notional use.
Typically when we've created all the GL Classifications we want we just import our GL Chart Of Accounts rather than manually entering it all here. But this example illustrates how we can have as many different accounts as we like with as many different categorizations for each account that we like.
Adding A Transaction Code
Transaction Codes are the heart of our multi-currency, multi-ledger financial engine for all of financial services. They allow you to configure the behavior of each type of Transaction that you want to record in the system. This is from something as simple as just allowing manual journal entries by the user to as complex as automating inter-company gl postings with custom formulas and code running to process other requirements.
We're going to create the following Purchase Transaction Code, with a Name of Purchase, Code of PUR, Type of Portfolio, and Ledger of Base:
- Transaction Type Values
Value: Current Cost
Type: Manual
Allow Value Auto GL: True - Transaction Code GL Entries
- GL Account: Investment Cost
Ledger:
Date: Trade
Entry: LocalFunctionalReporting
Transaction Type Value: Current Cost
(You will need to have adding the Transaction Type Value above first)
Debit Credit: Debit - GL Account: Cash
Ledger:
Date: Trade
Entry: LocalFunctionalReporting
Transaction Type Value: Current Cost
(You will need to have adding the Transaction Type Value above first)
Debit Credit: Credit
- GL Account: Investment Cost
There are a lot of options around the configuration for a Transaction Code, and the linked help sections above go into more detail around how to tailor them to your requirements. The values not mentioned in this section are just the default values provided when you create a new Transaction Code so you can leave them as their initial values for now.
Specifying the Ledger as Base in the Code means the user doesn't have to select it when creating a transaction, and all the GL Postings inherit that ledger as they are not overriding the value. We could if we wanted to create extra GL Entries that hit the Tax ledger for instance.
Likewise we're going to create the following Dividend Transaction Code, with a Name of Dividend, Code of DIV, Type of Portfolio, and Ledger of Base:
- Transaction Type Values
- Income Accrual
Type: Manual
Allow Value Auto GL: True - Income Payment
Type: Manual
Allow Value Auto GL: True
- Income Accrual
- Transaction Code GL Entries
- GL Account: Dividend Receivable
Ledger:
Date: Trade
Entry: LocalFunctionalReporting
Transaction Type Value: Income Payment
(You will need to have adding the Transaction Type Value above first)
Debit Credit: Credit - GL Account: Cash
Ledger:
Date: Trade
Entry: LocalFunctionalReporting
Transaction Type Value: Income Payment
(You will need to have adding the Transaction Type Value above first)
Debit Credit: Debit
- GL Account: Dividend Receivable
Creating Transactions
Now we have everything setup in order for us to easily enter a few transactions against our Asset A Instrument, and then be able to run a simple report to illustrate that.
To start we can go to Instruments and open our Asset A Instrument. Then we need to create a new Transaction against Asset A with the following properties:
| Property | Value |
| Transaction Code | Purchase |
All other properties can be left as the default values they acquire after you've selected the Purchase Transaction Code.
The system will populate the Transaction Date of today, Entity of Management SPV (which comes from the owning entity of Asset A), Instrument of Asset A (the instrument we're making this transaction against), a Currency of USD (coming from the currency of Asset A), and a Ledger of Base (coming from the Purchase Transaction Code definition). All of these are fine for now.
Next in the Transaction Values screen we simply enter a Current Cost of 1, 000, 000 (1 Million USD).
The system hasn't created any GL Entries for you automatically yet as it only does this when the status is committed or greater. If you change the Transactions Status to Committed you will see it automatically processes the rules of our Transaction Code and enters the following GL Postings for us:
| Account | Entity | Debit | Credit |
| Cash | Management SPV | 1,000,000 | |
| Investment Cost | Management SPV | 1,000,000 |
This is a simplified Postings view, your actual one in the system will include the dates, and all the other multi-currency debit/credits too.
We actually want to Finalize this transaction though, so change the Status once more to Finalized and Save the Transaction.
That's it!
Once it's setup, it's very easy to use our configured Transactions. This is obviously a very simple example, but your configuration could be way more complicated involving different Entities, Inter-company Journals, Multiple Ledgers, Multiple Transaction Values, Automatically calculated values (processing formulas in the Transaction Code), and many more GL Postings.
Next we need to create another new Transaction against Asset A with the following properties:
| Property | Value |
| Transaction Code | Dividend |
| Transaction Date | Place 10 or so days greater than today, or the date you used for the Purchase |
All other properties can be left as the default values they acquire after you've selected the Dividend Transaction Code.
Next in the Transaction Values screen we simply enter an Income Payment of 25, 000 (25 Thousand USD).
You can set the Status to Finalized and Save it straight away again. This time you will see it automatically books the following postings for you:
| Account | Entity | Debit | Credit |
| Cash | Management SPV | 25,000 | |
| Dividend Receivable | Management SPV | 25,000 |
This is a simplified Postings view, your actual one in the system will include the dates, and all the other multi-currency debit/credits too.
You can view the breakdown of this 25k dividend through the allocation path to see how the system allocates it by using the View Breakdown command from the Transaction view itself.
Creating A GL Rollup Report
A GL Rollup report is a simple way of quickly creating powerful hierarchical period end reporting across your GL that can consolidate anyway you like.
These reports run against our Capital Account Data Items which are created as a reporting snapshot of the GL during Period End processing.
This is a simple walkthrough example so we are reporting across everything within one period. We haven't closed periods for any of our entities forcing transactions into different financial periods. But you can of course try that yourself to expand this example.
Before we can run our report, we're going to need to create a GL Rollup report with a Name of Simple and GL Classification of Simple, like so:
- Header:
Name = Balance- Header:
Name = Opening- Rollup Classification:
Type = OpeningBalance
- Rollup Classification:
- Header:
Name = Income- Rollup Classification:
Type = PeriodEnd
GL Classification Name = Income
- Rollup Classification:
- Header:
Name = Purchase- Rollup Classification:
Type = PeriodEnd
GL Classification Name = Purchase
- Rollup Classification:
- Header:
All the other options can be left as their default values. There are a lot of possible options for different ways of consolidating across ledgers and other values. But for now this simple example illustrates how easily we can create a hierarchical gl report.
Creating A Period End
We can process period ends against our Umbrella Co Company Structure. This will automatically process all our GL entries on a year to date basis for every gl posting within all entities within our structure and burn in our Capital Account Data Item records for efficient, accurate and fast period end reporting.
First we need to open the Umbrella Co Company Structure, and then we can go to the Period Ends tab and create a new Period End with the following values:
| Property | Value |
| Transaction Date | End of month, or next month to make sure you cover the date you used for the Dividend Transaction above. If your date is before this it will not be included in any reporting here. |
| Description | Example |
You wont be able to change the Status, as it is locked for editing, and is meant to be changed as part of a process. If you click Save it will prompt you what status you want, and you should select Committed to allow you the opportunity to modify this later until you are sure it is correct and happy to Finalize it.
Ensure the Recalculate option is ticked.
Once the Period End has finished processing we will be able to run the "Simple" GL Rollup report we created above earlier on.
Choose the GL Rollup tab from within your Period End and the system will prompt you which GL Rollup report to run against your Period End. Select "Simple" (The GL Rollup report we created earlier) and the system will automatically display the results.
You can group by the various column headers, or you can export into excel, excel templates and perform pivots/analysis etc.
There are a huge amount of reporting options available to you from our Reporting functionality. This simply highlights how easy it is for you to create your traditional GL Reports such as Trial Balance, PnL, Capital Account Statements, etc.
If you have been following along to this walkthrough from the video as well, you will have seen how from a completely blank database you can easily, and intuitively configure the basics of everything you need from an entity structure, allocations, transactions, gl postings, and reporting perspective in under 15 minutes.
There are a lot more help resources aimed at delving into these functions in more detail depending on you requirements.